Viewing 360 Degree Full Circle Panorama Photos For The Remainder Of ZMM Part 4 Album:
..These Panoramas Are Along The ZMM Route. Starting At Narrators High Point Caspar, CA Thru To San Francisco Harbor, CA.
.AFTER You Click On The Blue Link Below You Will Be Able To See =>
One Panorama For Last Part Of ZMM Chapter 31 And Six Panoramas For ZMM Chapter 32.
*************************
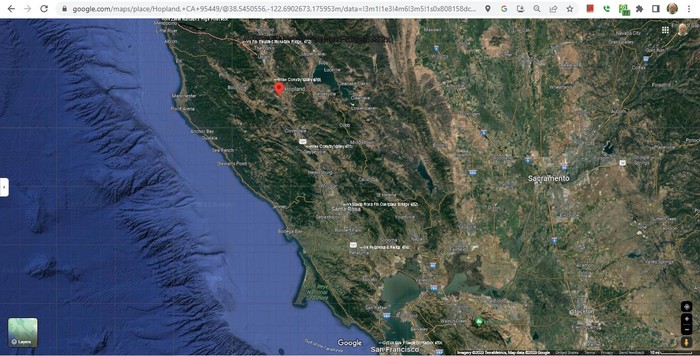
In The /\ Above /\ Photo Of Satellite View (Please ClickOn Photo To get The Largest View) => Starting At Upper Left, And Then Looking Successively Down & To The Right, Please Notice The Following =>
Which Will Help You To Identify The ZMM Route from Mendocino, CA (Upper Left) To San Francisco (Bottom, A Bit Right Of Center)
Orange Line approximately marks the Comptche Ukiah Road, from Mendocino, CA to Ukiah, CA.
The Red Pinpoint Marks Hopland, CA.
And below Hopland, CA you can pick out the faint yellowish line that marks US-101.
Follow the faint yellowish line that marks US-101, Down & To The Right, to San Francisco Harbor.
Also Notice 7 White Labels That Are Stronger White.
These mark the approximate location of the following Panorama Camera Photo Vantage Points & Respective WayPt #s =>
<-Vu ZMM Narrators High Point 463x (This is partly obscured upper left.)
<-Vu Fm Elevated Mountain Ridge. 472x
<-Wine Country Valley 475x
<-Wine Country Valley 481x
<-Vu Santa Rosa Fm Overpass Bridge 482x
<-Vu Petaluma & Fields 484x
<-Grt Vu San Francisco Harbor 489x
DATE-LINE April 16, 2023. ZMMQ GALLERY PANORAMA INSTRUCTIONS:
FIRST A NOTE TO THE WISE => Whenever You See Long & Complex Instructions =>
. DONT READ EM! Just Try And See How Far You Can Get, And ONLY When You Run Into Problems, Go Back & Read!!
The instructions below will take you to an "Album of Panorama Photos", has been made by "stitching" together (typically) eight different photos. As you are looking at these panoramas, you will be "scrolling", (left to right) through each of the 8 original pictures, in 360 degrees of full circle rotation. The full width of these panoramas is about seven feet!! As you will see, most of these Panorama Photos are Very Wide, and thus quite dramatic!
Suggestion for Beginners: Place your "mouse pointer" on the photos in this album (any photo in this Gallery) and if it "shows a hand", then a "mouse click" will give you will (most of the time) get a much larger view. Typically you will have to twice in succession "click-the-photo", to get the largest and best view. At this magnification, the panorama photos you are viewing are about 7 feet wide, so the view is quite dramatic!!
Second Suggestion for Beginners: When you have the largest view of a panorama, you must use the "slide bars" at right side (or bottom) of the photo to view the whole picture. First use the right hand slider to adjust the picture up-down to see both land and sky. (You may have to "mouse drag" the top if the window way to the top, and drag the bottom as far as possible down. Ditto for the right and left sides of your screen window.) Then use the bottom "slide bar" to scan the whole photo, left to right. The caption of each panorama will (usually) indicate the direction of the ZMM Route and the direction of Geographic North.
Third Suggestion for Beginners: Be sure to remember that the "Homepage at the lower right of this (and every) Gallery page. A mouse "click on it", will take you to Menu Items (near top) that will take you to detailed information about all my Gallery Photos and how to view them.
SPECIFIC VIEWING INSTRUCTIONS:
Of course, you may view these Panorama Photos any time, but you should make a mental plan as to when to do this. Most practical is to =>
..1) Read and do the words in bold next down.
..2) And AFTER the Medium Sized Panorama comes up, read & understand what you are looking at, AND remember WHERE in your Internet Browser, these Panorama Photos are to be found. Then
..3) If you have been viewing the photos of this ZMM Part 4 Album, simply continue this viewing, and when you see a) At caption bottom WayPt = #X OR b) Words that say the photo is ~Part of a Panorama, c) THEN go to where you may view panoramas as you did in 2) above.
DOING INSTRUCTION STEP 1) ABOVE:
4) AFTER you click on the Blue Link Below, a Medium Size View comes up => IMMEDIATELY Read the Caption Words, Right away, while they are short lines. In other words, read these shorter lines, before clicking to make this Panorama so large it is harder to read the Caption Words.
. Right Click And Select New Tab, To View This WayPt = 463x 360 Deg Panorama Photo.
5) AFTER Medium Size View comes up, and you read the words, ClickOn The photo to get Full Size, and now do the above three successive => Suggestion for Beginners:
DOING INSTRUCTION STEP 2) ABOVE:
6) After doing 5) above, and you are ready to see the NEXT Panorama Photo, use ClickDrag Slide Bars Bottom Or Right so you can see at Upper Right In Rectangle >> . ClickOn This >> to go to the NEXT Panorama Photo, which also will be Full Size.
6) If you are having trouble reading the LONG lines of words, at any time, ClickOn The photo to get Medium Size,
If you like these Panoramas, please send an email. HenryG__USCA.edu.
Click Here To See Google Satellite View, Same As /\ Above /\ Photo. You Might Want To Explore Further The ZMM Route Areasl
NOTE: Of course, the 7 White Labels That Are Stronger White, will NOT be in a Google Satellite View.
*************************
(Photo = GoogSat MendocinoCA to SanFranciscoCA +Pointer&Txt LocZmmRtPanoramas&WayPts3 ...... ZMM Page = 366 thru 373 ...... WayPt = 463x thru 489x)